17+ DIY Garden Lantern Ideas To Add More Light To Your Backyard
Creating a cozy and inviting atmosphere in a garden can be simple and fun with the right DIY projects.
Garden lanterns are a fantastic way to add charm and elegance, especially during the evenings.
Anyone can make beautiful lanterns that enhance their outdoor space with a variety of materials and creative designs. Whether using mason jars, paper bags, or even repurposed items, each lantern can showcase personal style.
The joy of crafting these lanterns lies in their versatility.
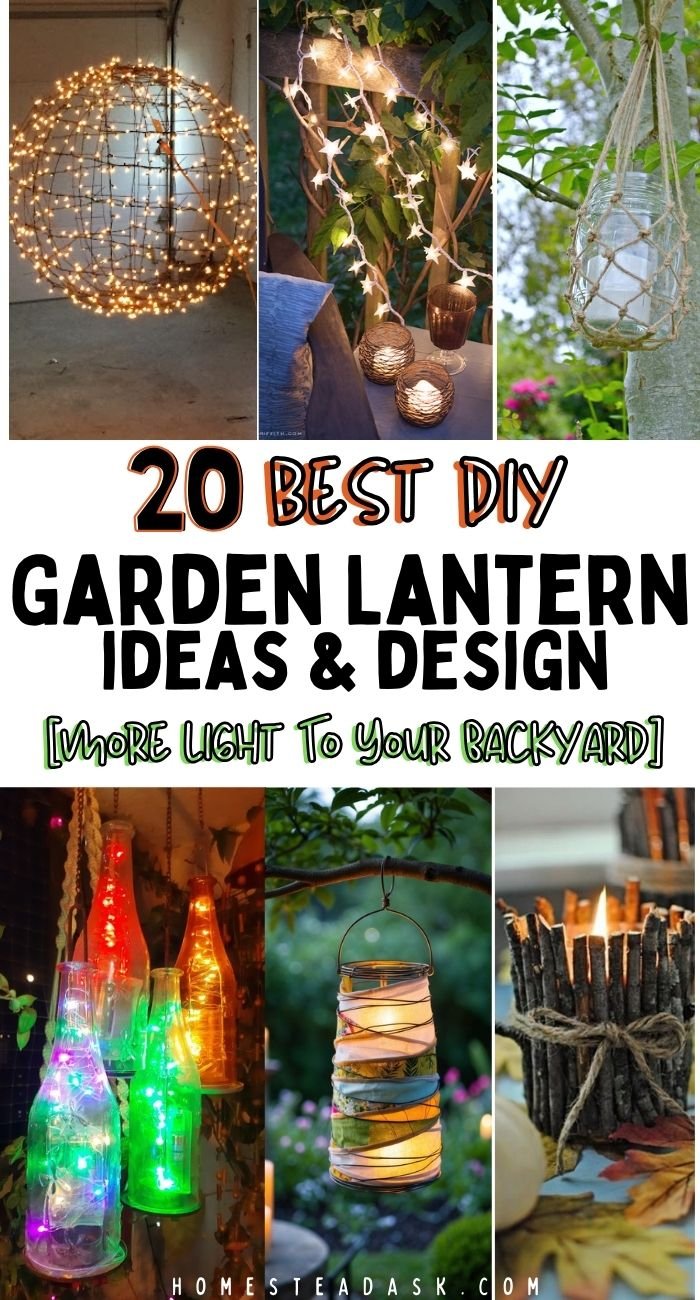
Garden lovers will appreciate how these simple additions can transform their outdoor areas into warm and inviting retreats.
Types Of Garden Lanterns
Garden lanterns come in various styles, each offering unique benefits and aesthetic appeal. Understanding these types can help select the best option for enhancing outdoor spaces.
Solar Lanterns
Solar lanterns are a popular choice for eco-friendly illumination.
They harness sunlight during the day, converting it into energy to power LED lights at night.
No wiring or electricity is needed, making installation simple and affordable.
These lanterns come in different designs, from classic styles to more modern appearances.
They can be hung from trees, placed on tables, or lined along pathways.
Many solar lanterns are equipped with motion sensors or dimmers, allowing for adjustable brightness based on needs.
Just make sure to consider their placement to maximize sun exposure.
Regular cleaning of the solar panels also ensures optimal performance.
LED Lanterns
LED lanterns are known for their energy efficiency and long lifespan.
Unlike traditional bulbs, LEDs use less power and can last for years without needing replacement.
This makes them both economical and environmentally friendly.
Available in various colors and styles, LED lanterns can fit into almost any garden theme.
They often come with features such as dimmers or timers, providing versatility in lighting options.
These lanterns can be rechargeable, coming with USB charging options or powered by batteries.
This flexibility allows for easy setup and relocation around the garden.
Candle Lanterns
Candle lanterns offer a warm, inviting glow that enhances any outdoor setting.
Typically made of glass or metal, they safely house lit candles while protecting the flame from wind and rain.
They come in diverse styles, from rustic to modern, adding charm to patios and gardens.
Using scented candles can also enhance the atmosphere with delightful fragrances.
Positioning them along paths or near seating areas creates a cozy environment for gatherings.
Just remember to prioritize safety by ensuring they are placed away from flammable materials and monitored while lit.
Decorative Lanterns
Decorative lanterns are designed primarily for aesthetics and can serve as beautiful garden accents.
These lanterns can be made from various materials, including metal, wood, or ceramic, showcasing intricate designs or vibrant colors.
They can serve multiple purposes: as stand-alone features or as part of centerpieces on tables.
While some decorative lanterns may house candles or LED lights, others function as purely ornamental items.
Hanging them from trees or placing them on patios adds unique flair to any outdoor space.
Seasonal changes also inspire creativity, encouraging the use of different lanterns for holidays or themed events.
Choosing The Right Lanterns For Your Garden
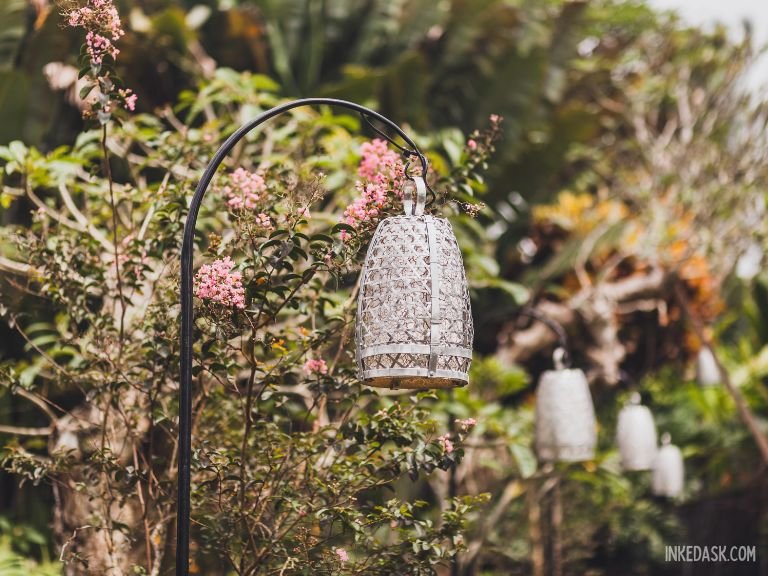
Selecting the right lanterns for a garden involves considering the garden’s style, the size and scale of the lanterns, and the specific lighting needs. Each element plays a vital role in enhancing the overall aesthetic and functionality of the outdoor space.
Assessing Your Garden’s Style
The first step is to evaluate the existing style of the garden.
Is it modern, rustic, or perhaps a blend of both? Lanterns should complement this style to create a cohesive look.
- Modern Gardens: Sleek, minimalist lanterns work well. Materials like metal and glass in neutral colors are excellent choices.
- Rustic Gardens: Opt for lanterns made of wood or wrought iron that add charm. Vintage or distressed finishes will enhance the rustic feel.
- Eclectic Spaces: Mixing different styles can bring vibrancy. Combining varied lantern designs can lead to a unique ambiance.
Carefully matching the lanterns to the garden design can elevate the outdoor atmosphere significantly.
Considering The Size And Scale
The size and scale of the lanterns must align with the garden’s dimensions.
Oversized lanterns can dominate smaller spaces, while tiny lanterns may get lost in larger gardens.
- Small Gardens: Choose lanterns that are compact and delicate. Hanging lanterns or small tabletop versions can create a cozy feel.
- Large Gardens: Larger lanterns or clusters of smaller ones can make a bold statement. Consider using taller lanterns along pathways or large, hanging lanterns from trees to draw the eye upward.
Heights and widths of the lanterns should be balanced with surrounding plants and structures. This creates a harmonious look that feels intentional.
Lighting Needs
Think about how much light is needed in the garden. The function of the space will guide the choice of lanterns.
- Ambient Lighting: Lanterns with diffused light work best for creating a soft, inviting glow. Options like frosted glass reduce brightness while enhancing charm.
- Task Lighting: For practical use, brighter options are necessary. LED bulbs provide ample light and can improve safety in walking areas.
- Solar Lanterns: These are eco-friendly, especially for spaces not connected to electrical outlets. They charge during the day and light up at night, adding both functionality and sustainability.
By considering these three factors, you can successfully choose lanterns that enhance both the beauty and usability of the garden.
Creative Placement Ideas
Getting the placement of garden lanterns right can transform any outdoor space. Thoughtful arrangement enhances both safety and aesthetics. Here are some specific ideas for placing DIY lanterns creatively.
Pathway Lighting
Using lanterns along pathways not only adds charm but also provides safety at night.
They guide the way and help prevent accidents.
- Spacing: Place lanterns about 3 to 5 feet apart. This ensures sufficient light while creating a cozy atmosphere.
- Height Variation: Consider varying the height of the lanterns for visual interest. Some can be mounted on stakes, while others rest just above ground level.
- Materials: Use materials that complement the surrounding foliage. Metal lanterns in dark tones work well against bright flowers.
Adding lanterns along pathways invites guests to explore the garden even after sunset.
Accentuating Garden Features
Highlighting specific garden features with lanterns can draw attention to beauty spots. This creates focal points that enhance the landscape.
- Near Focal Points: Position lanterns around natural features like trees, fountains, or sculptures. The glow should enhance the feature without overpowering it.
- Colors and Textures: Match the colors of the lanterns to their surroundings. Glass lanterns can reflect colors, while metal varieties can add a rustic feel.
- Layering Light: Combine lanterns with other light sources like string lights or solar spotlights for a layered effect.
This approach makes each feature more pronounced, creating a magical evening ambiance.
Hanging Lanterns
Hanging lanterns bring a whimsical touch to any garden. They can be suspended from branches or hooks, offering unique lighting options.
- Branches and Pergolas: Hang lanterns from tree branches or pergolas at different heights. This adds depth and character to the space.
- Grouping: Cluster multiple lanterns together for a striking effect. Use varying sizes and shapes for a playful look.
- Use of Ropes: Secure them with decorative ropes or chains that match the garden’s style. This adds a finished touch to the overall design.
Hanging lanterns create a floating effect, making the space feel enchanting during evening gatherings.
Tabletop And Ground Lanterns
Tabletop and ground lanterns serve as cozy lighting options for patios or garden tables. They provide a welcoming glow for social gatherings.
- Fill Spaces: Place lanterns on dining tables or garden benches to create intimate settings. This invites guests to linger in warm light.
- Ground Placement: Position lanterns among plants or on pathways, allowing them to blend naturally into the landscape.
- Themed Arrangements: Create themes using different lantern styles. For a rustic look, use wooden lanterns; for a modern vibe, choose sleek metal designs.
These lanterns not only illuminate the area but also contribute to the garden’s overall aesthetic, making every gathering special.
#1- Coastal Look Rope Mason Jar Lanterns
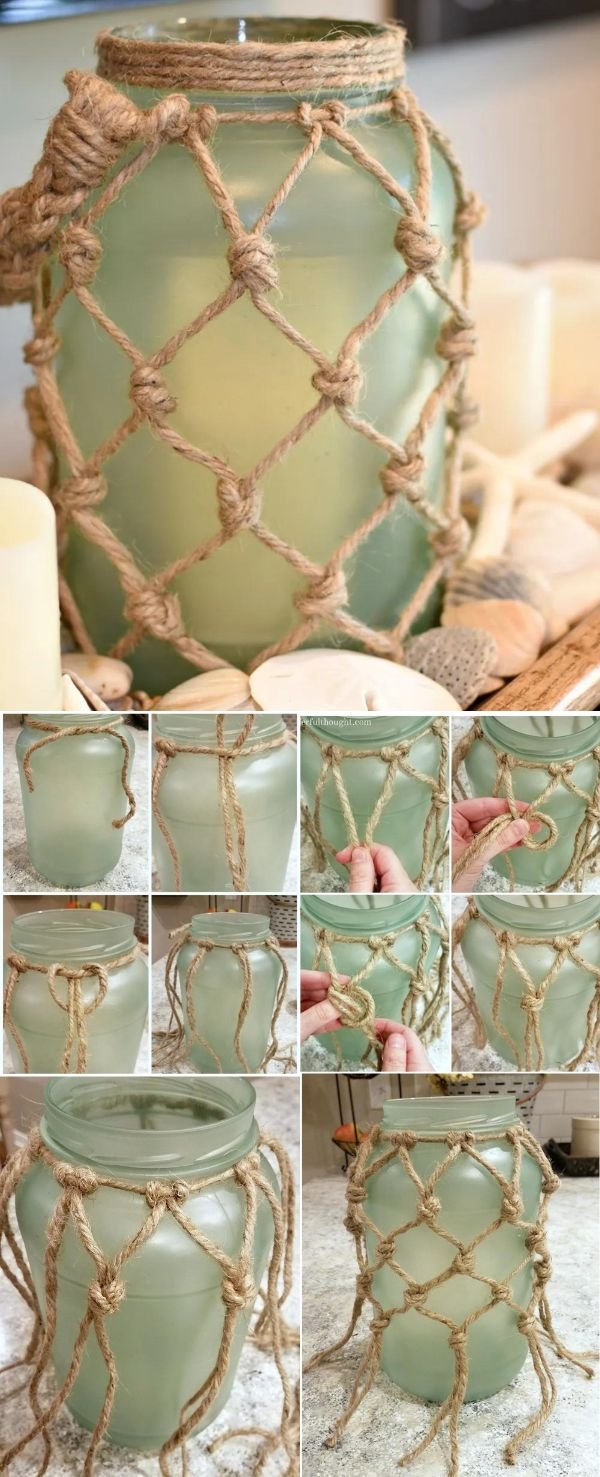
To get started, gather these supplies:
- Mason jars
- Natural rope or twine
- Hot glue gun and glue sticks
- Battery-operated tea lights
- Decorations like seashells or starfish (optional)
First, take your mason jars and clean them thoroughly. Let them dry completely before you begin.
Next, use the hot glue gun to wrap the natural rope around the neck of the mason jar. Apply a line of glue as you go to secure it in place. You can create several layers or just one, depending on how you want it to look.
Once the rope is in place, add decorative elements like seashells or starfish for that beachy vibe. Glue these onto the jar for a personalized touch.
Finally, place battery-operated tea lights inside the jars. They will create a soft, warm glow, perfect for evenings on the patio. You can hang these lanterns from hooks or place them around your garden.
These coastal look rope mason jar lanterns make any outdoor area feel inviting and relaxing. Enjoy your beautiful and cozy garden!
Tutorial/Source: awonderfulthought.com
#2 – Ice Sculpture Colored Candle Holders
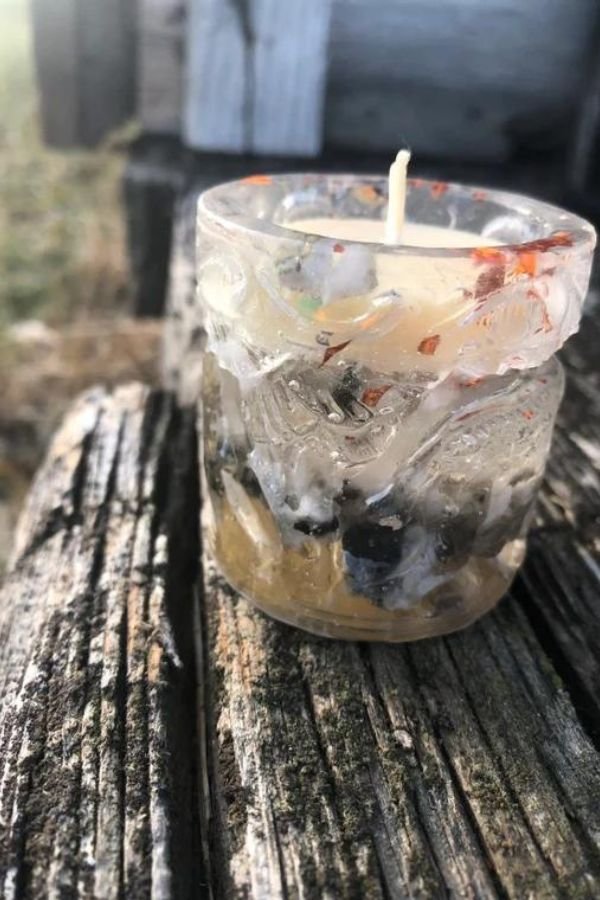
Creating ice sculpture colored candle holders is a fun way to add beauty to my garden during the winter months. These holders not only look stunning but also serve as a unique light source.
To get started, I gather a few supplies:
- Plastic containers (various sizes)
- Water
- Food coloring
- Candles (tealight or small votive)
I begin by filling the larger container halfway with water. Next, I add a few drops of food coloring to create the desired color. If I want a layered effect, I can let the first layer freeze for a few hours before adding another colored layer.
Once the container is solid, I carefully remove the ice sculpture. I do this by running warm water over the outside. Then, I place a smaller container upside down in the middle and fill it with water. This creates a hollow space for the candle.
After the top layer of ice is removed, I set a candle in the opening. The candle’s glow shines beautifully through the colored ice, creating a lovely ambiance in the garden.
These ice candle holders are perfect for adding charm to winter gatherings or just brightening up the outdoors. They melt over time, making each use a unique experience. Plus, they are a great conversation starter!
Tutorial/Source: etsy.com
#3 – Wire-Wrapped Fabric Collage Lantern
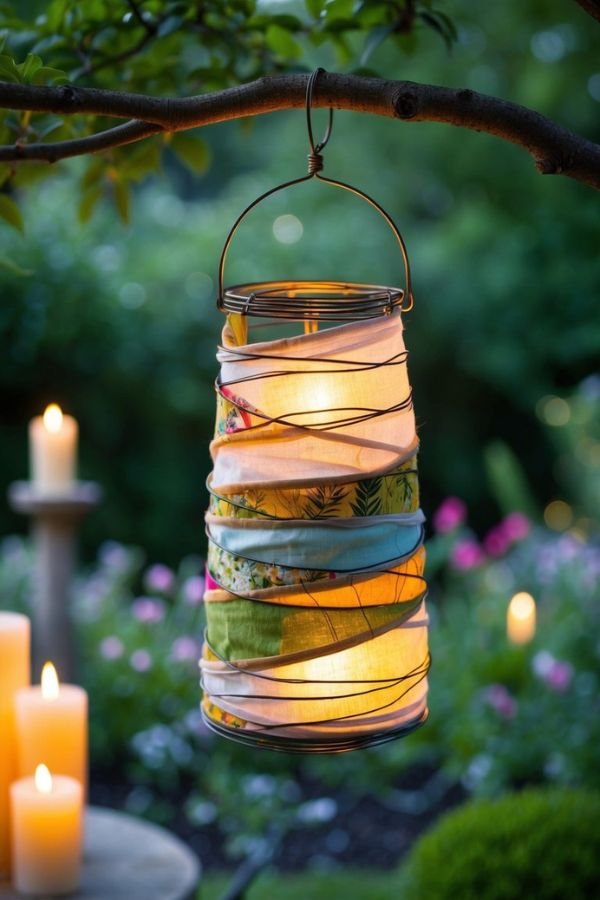
Materials Needed:
- Wire (floral or craft wire)
- Fabric scraps (various colors and patterns)
- Wire cutters
- Scissors
- LED light source
First, I form a wire frame by bending the wire into a sphere or any shape I fancy. This will serve as the base for the lantern.
Next, I cut my fabric scraps into different shapes and sizes. Then, I wrap the fabric pieces around the wire frame. This adds texture and a vibrant look to the lantern.
To secure the fabric, I twist the wire around it gently. I make sure the fabric is snug but not too tight to keep it looking soft and inviting.
Once I’ve added all the fabric, I place an LED light inside. This is safe and brightens up the lantern beautifully.
Tips:
- Mix and match fabric styles for a unique design.
- Use sheer fabrics for a delicate glow.
- Experiment with different wire shapes for varied looks.
This lantern is not only a stunning decoration but also a great conversation starter in my outdoor space. It lights up the night and adds a personal touch to my garden.
#4 – Patterned Metal Makes Graphic Reflections
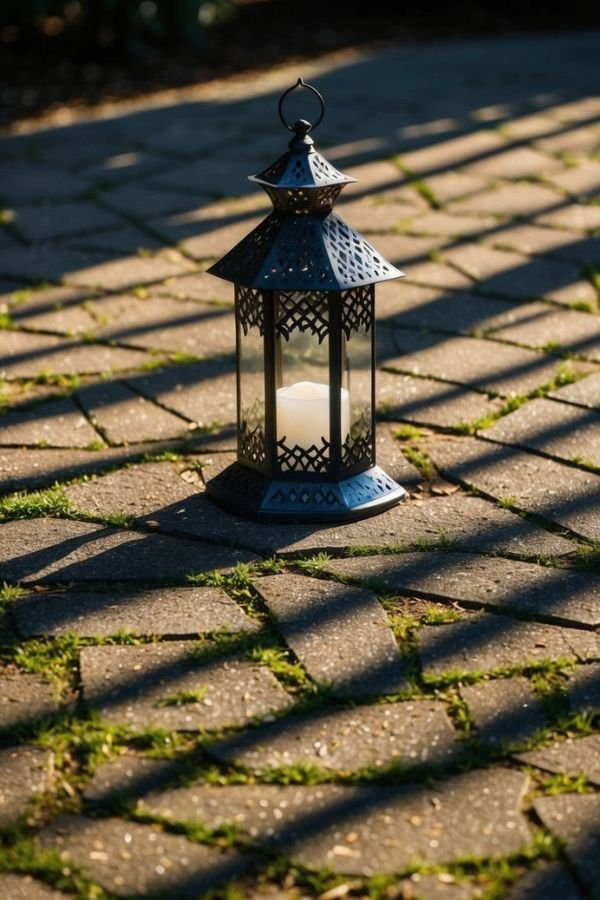
I enjoy experimenting with different patterns. Some popular options include:
- Geometric shapes: These create sharp, clean reflections that can energize a space.
- Floral designs: These add a soft, romantic feel to the ambiance.
- Nature-inspired motifs: Leaves or trees can connect the lanterns with the garden.
When the sun sets, the lanterns emit light through the patterns. This produces a dance of shadows and shapes on the ground and nearby plants. It’s delightful to watch.
Choosing the right metal is essential. Copper and brass not only look elegant but also age beautifully. They develop a patina over time, adding character.
Additionally, consider the placement of your lanterns. Hanging them from branches or placing them on tables can create different effects. I find that varying the heights can also add depth to the light display.
Incorporating patterned metal lanterns is a straightforward way to enhance my garden. The unique reflections they produce turn an ordinary evening into something magical.
#5 – Whimsical DIY Fairy Lantern

Tutorial/Source: ehow.com
#6 – Hole-Punched Painted Tin Can Lanterns

Tutorial/Source: welcometonanas
#7 – Repurposed Bottle With Fairy Lights
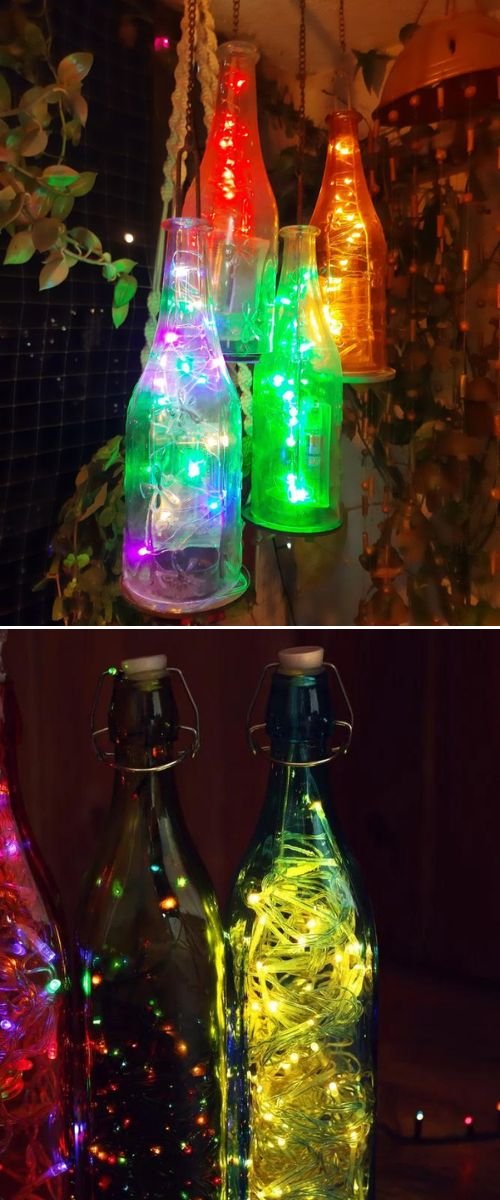
To get started, choose a clean, empty bottle. Glass wine or soda bottles work great. Remove the label and give it a good wash.
Next, gather your materials:
- Fairy lights: Battery-operated ones are the best because you won’t need nearby outlets.
- Bottle: Your choice of size and shape.
- Decorative elements (optional): You can add pebbles, sand, or even small flowers inside for extra charm.
Carefully insert the fairy lights into the bottle. Make sure to leave a bit of the wire out at the top for easy access to the switch.
For an added touch, place the bottle in a spot where it can catch the evening light. The glass will reflect the twinkling lights beautifully.
This simple project not only recycles old bottles but also adds personality to my garden. I love how each bottle can be unique, depending on the lights and decorations I choose.
Feel free to experiment with different bottles and arrangements. With a little creativity, I can customize my garden ambiance any way I like.
Via: Pinterest
#8 – DIY Illuminated Fairy Scene Lantern
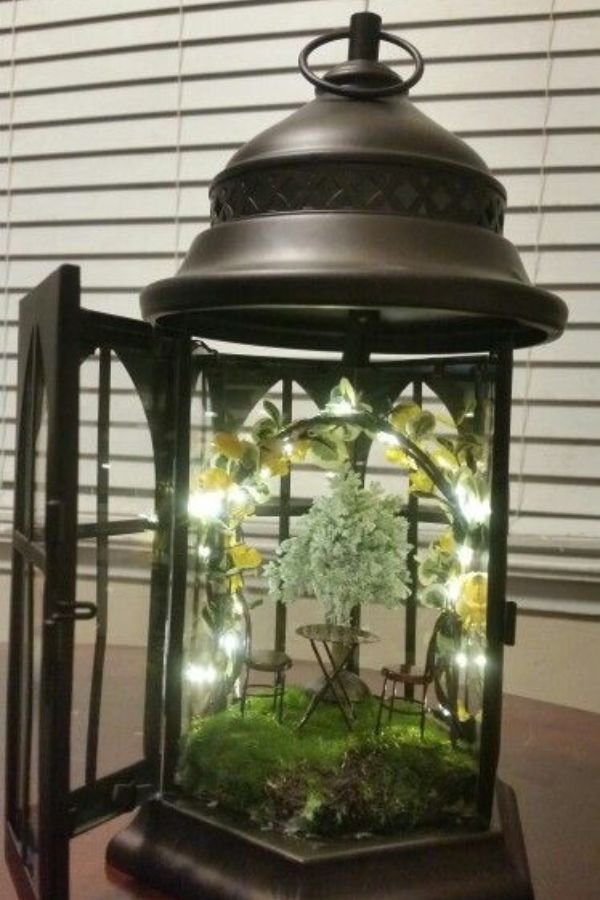
Materials Needed
- A glass or plastic jar
- LED fairy lights
- Small decorations (e.g., miniature fairies, flowers, pebbles)
- Soft moss or artificial grass
- Hot glue gun
Steps to Create
- Prepare the Jar
Clean the jar and remove any labels. This will be the magical home for your fairy scene. - Add Base Layer
Place a layer of soft moss or grass at the bottom. This adds a natural feel and supports the decorations. - Arrange Decorations
Use the glue gun to secure your miniature items in place. I like to create little story scenes, like fairies sitting on toadstools. - Insert Lights
Carefully tuck LED fairy lights around the decorations. Make sure they’re tucked in nicely to avoid damage. - Seal the Jar
If you like, cover the jar with a lid or decorative mesh. This enhances the look and keeps everything safe inside.
Displaying Your Lantern
Choose a spot in your garden where it can shine. Placing it among plants can make it look even more enchanting at night!
My favorite part is watching the soft glow light up the garden, creating a warm and inviting atmosphere. This DIY project is not only fun but also a beautiful way to brighten any outdoor space.
Via: Pinterest
#9 – Simple Hanging Jar Lanterns
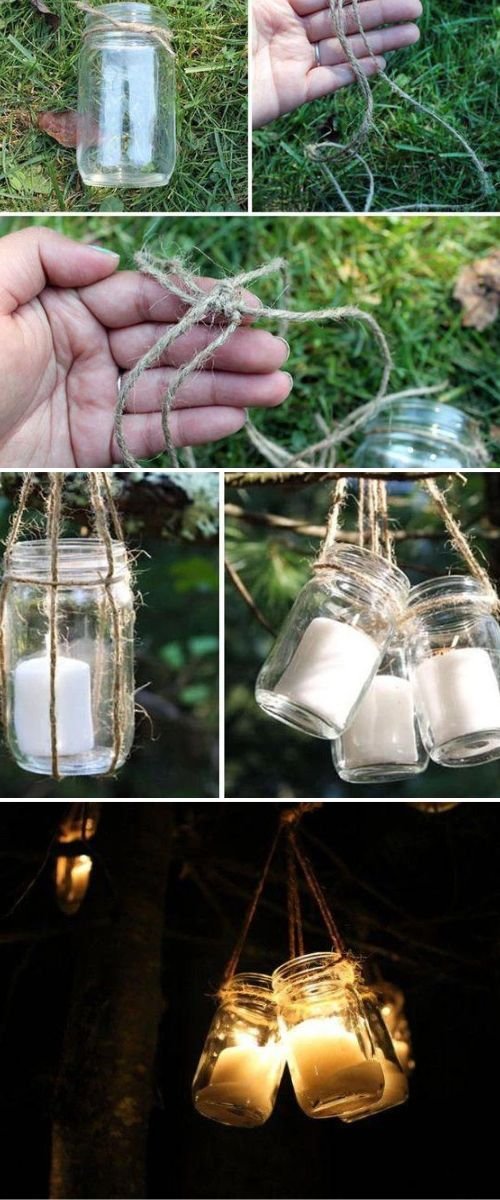
Tutorial/Source: brit
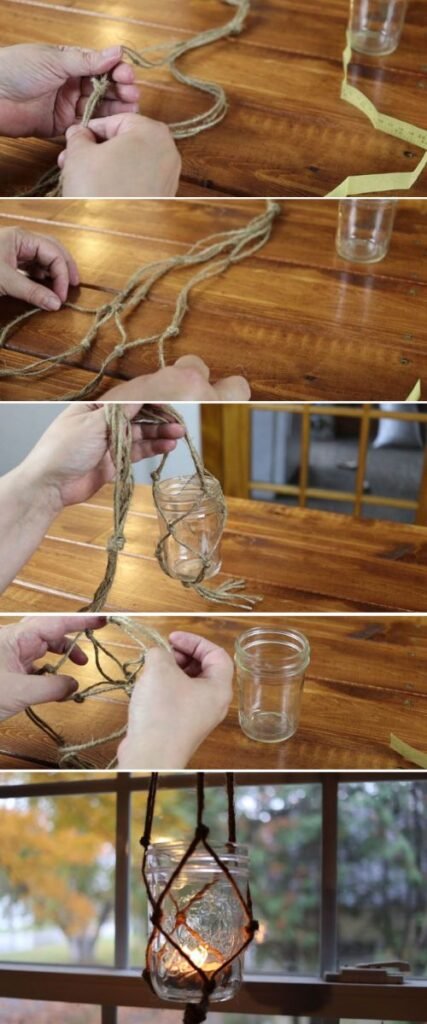
#10 – Boho Macrame Mason Jar Lantern

This lantern looks lovely when hung from a tree branch or on a patio. It’s perfect for outdoor gatherings or cozy evenings on my porch. The combination of the macrame design with the light creates a magical atmosphere in any space.
You can even customize the look by adding beads or different colors of cord to fit my style. This project is not just beautiful, but it’s also a delightful way to spend an afternoon.
Tutorial/Source: girlabouttownhouse
#11 – String Light DIY Paper Stars
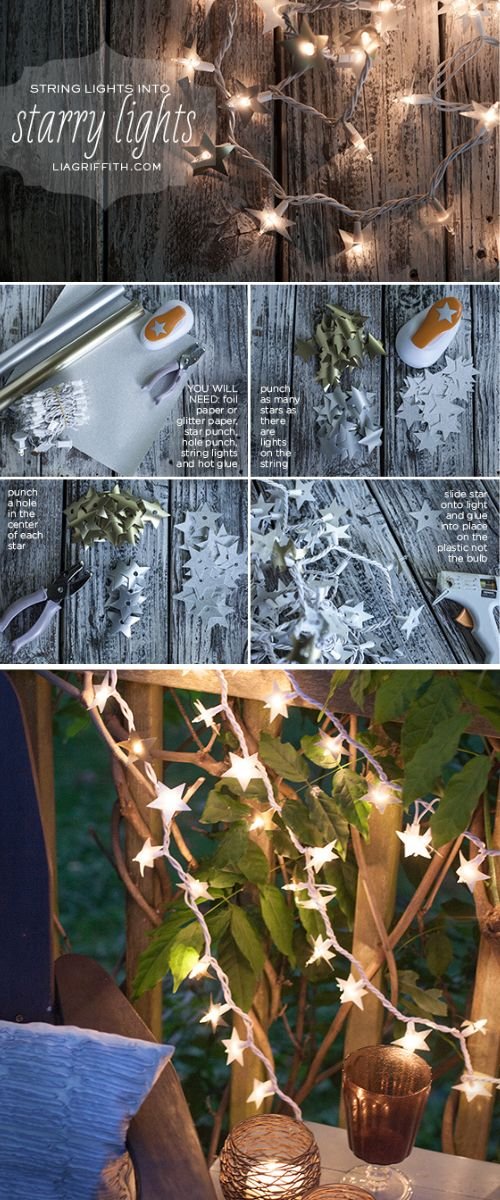
These DIY paper stars are perfect for parties or quiet evenings outside. They bring a bit of magic to your garden space without much fuss.
I enjoy showcasing my creativity while adding light to my outdoor area. Each time I see them twinkling, it makes the effort worthwhile!
Tutorial/Source: liagriffith
#12- Jute Knotted Bottles
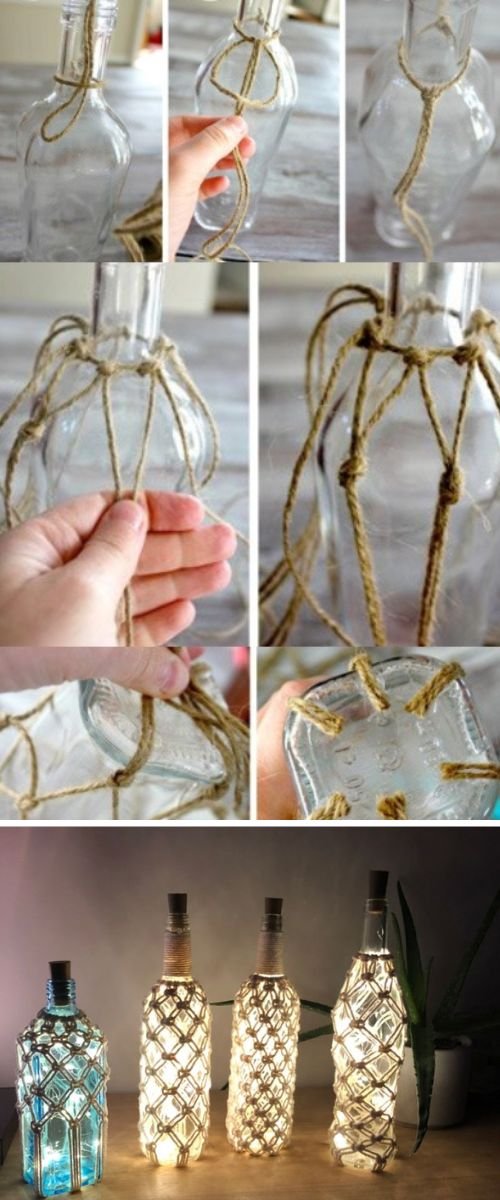
Tutorial/Source: wayfair
#13- Wine bottle lantern
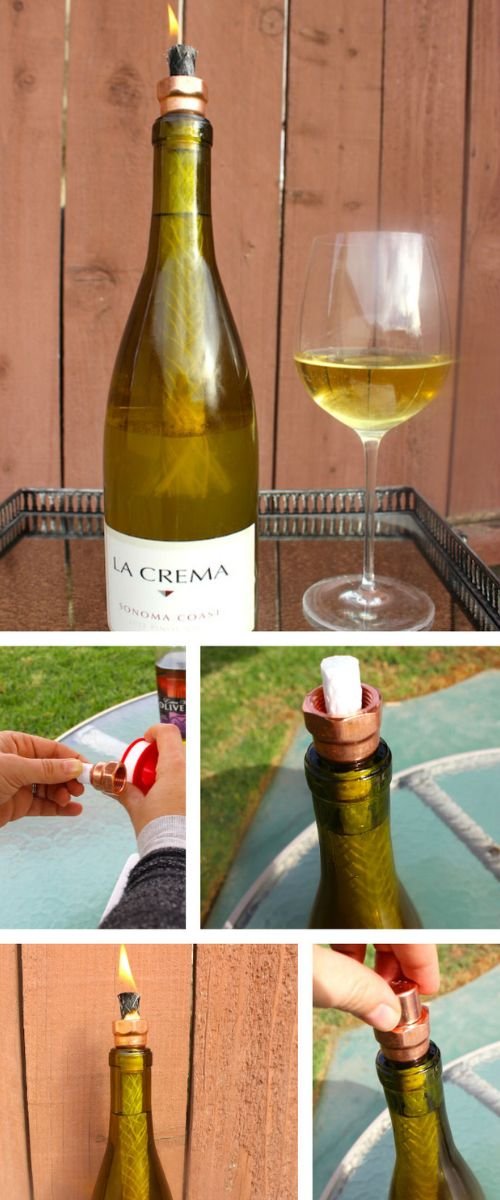
Tutorial/Source: lacrema
#14- Simple DIY Hanging Tea Light Holders
Tutorial/Source: sustainableslowliving
#15- DIY Outdoor Light Balls

Tutorial/Source: pineandpoplar
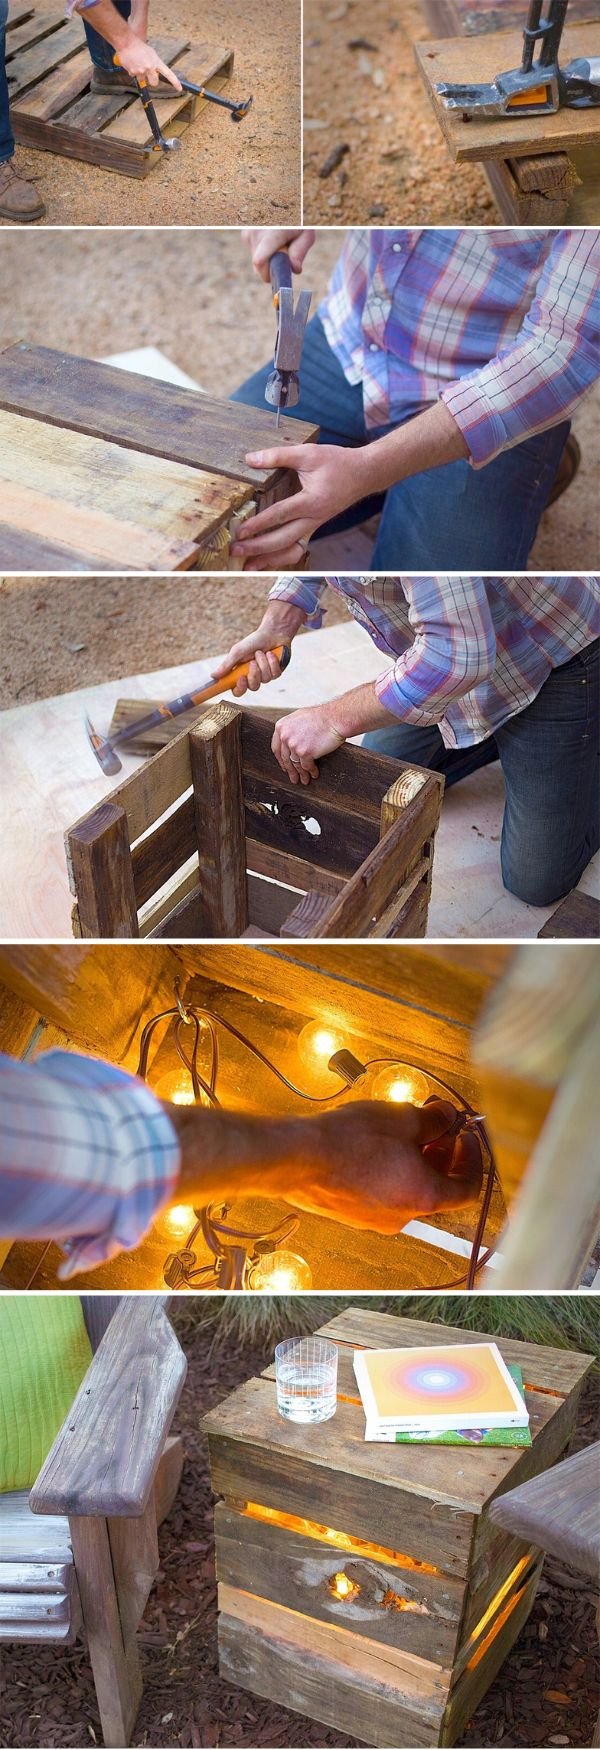
#16 – DIY Lights from Recycled Pallet
Tutorial/Source: fiskars
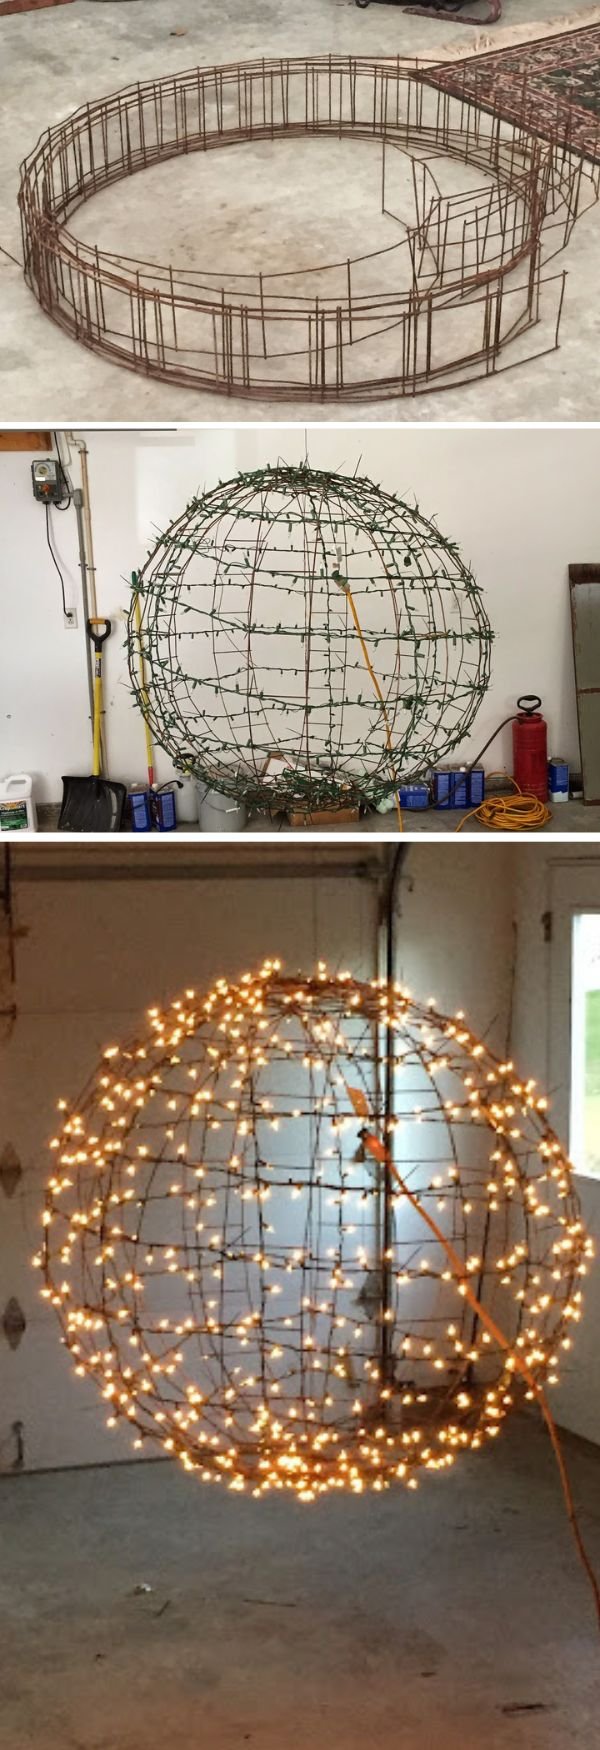
#16 – Hanging Light Orb
Tutorial/Source: thechirpingfrog

![How To Fill Raised Garden Beds - [With Simple 5 Layer!] 40 How To Fill Raised Garden Beds - [With Simple 5 Layer!]](https://homesteadask.com/wp-content/uploads/2024/09/How-To-Fill-Raised-Garden-Beds-With-Simple-5-Layer-768x614.jpg)
![How to Build a Simple Raised Garden Box [Easy DIY!] 41 15+ Recycled Garden Edging Ideas to Enhance Your Outdoor Space [Visual Guide]](https://homesteadask.com/wp-content/uploads/2024/09/15-Recycled-Garden-Edging-Ideas-to-Enhance-Your-Outdoor-Space-Visual-Guide-2-768x614.jpg)
![How To Lay Brick Border Garden Edging - [11 Easy DIY Step] 45 How To Lay Brick Border Garden Edging - [11 Easy DIY Step]](https://homesteadask.com/wp-content/uploads/2024/09/How-To-Lay-Brick-Border-Garden-Edging-11-Easy-DIY-Step-1-768x614.jpg)