25 DIY Garden Projects Using Sticks And Twigs (Cheap And Easy)
Crafting with nature adds a special touch to any home or garden. Sticks and twigs, often overlooked, can transform simple ideas into charming projects.
With a little creativity, anyone can turn these natural materials into functional and decorative pieces.
Imagine creating a rustic photo frame or a whimsical garden fence. These DIY projects are not only budget-friendly but also bring personal flair to outdoor spaces.
Using what nature provides encourages sustainability and creativity, perfect for any garden enthusiast looking to try something new.
Throughout this article, discover 17+ DIY Garden Projects Using Sticks And Twigs.
Each project ranges in difficulty, allowing everyone to find something that suits your style and skill level.
Whether it’s building a twig trellis or making unique garden décor, there’s something for every DIY lover.
DIY Twig Trellis
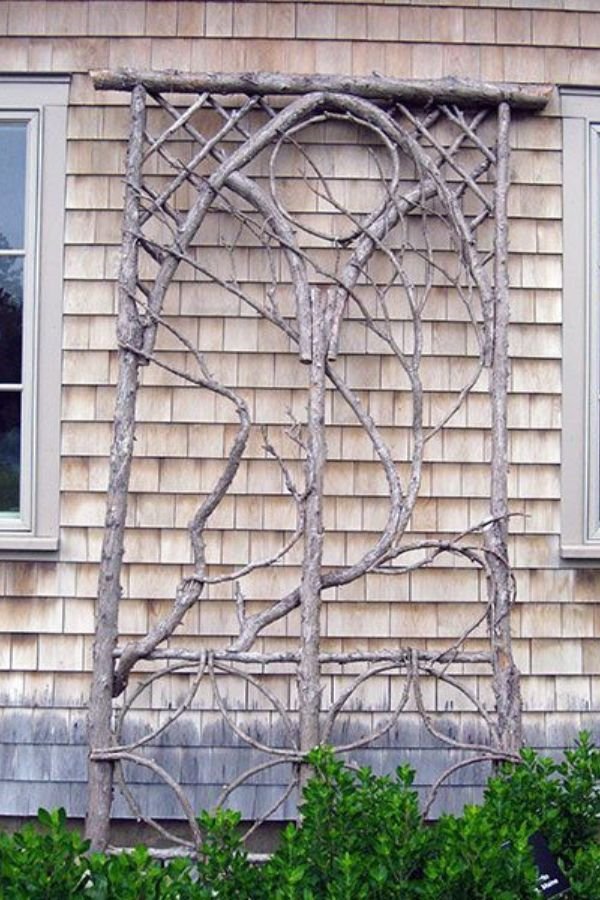
Creating a DIY twig trellis is a simple and fun project that adds charm to any garden. A twig trellis not only provides support for climbing plants but also enhances the garden’s natural beauty.
Materials Needed
- Twigs and branches: Collect sturdy twigs.
- Natural twine: This will hold everything together.
- Gardening tools: A spade for digging holes.
Steps to Create the Trellis
- Design your layout: Start by arranging the twigs on the ground. This helps visualize the final design.
- Construct the frame: Dig two holes for the base and place sturdy branches in them.
- Attach the twigs: Use the natural twine to lash the twigs to the frame.
- Tie them securely at intersecting points.
Tips for Success
- Use flexible branches for curves and arches.
- Consider adding bamboo stakes for extra support if the trellis will hold heavy climbers.
- Paint or stain the twigs if a different look is desired.
A twig trellis is not only functional but also makes a unique statement in the garden.
Tutorial/Source: hearthandvine.com
2. Woven Twig Basket Pendant Lamp
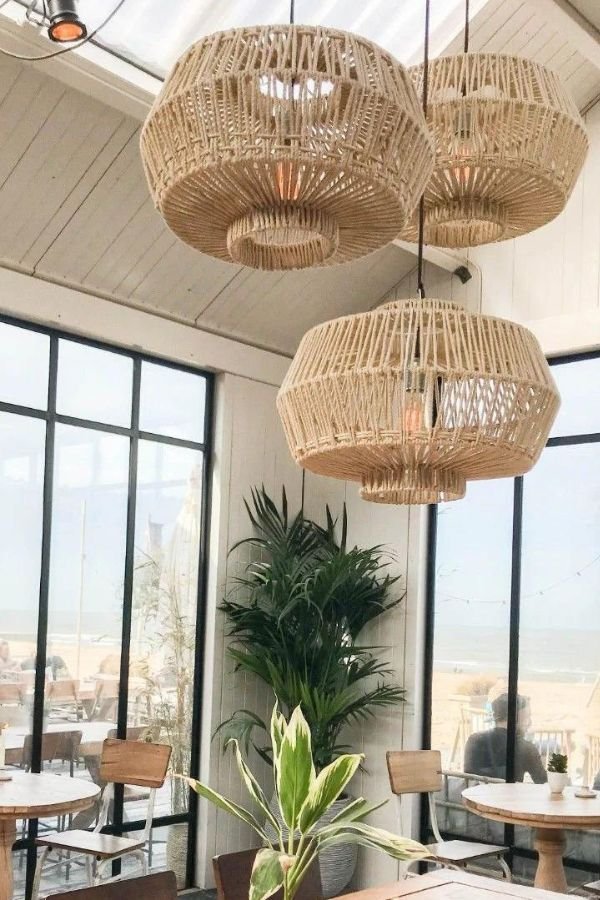
Creating a woven twig basket pendant lamp is a fantastic way to blend nature with home decor. This project not only enhances lighting but also adds a rustic touch to any space.
To start, gather materials like flexible twigs and a light fixture. Choose twigs that are similar in thickness for a uniform look.
Steps to Make the Lamp:
- Form the Base: Shape the twigs into a basket form by twisting and weaving them together. This acts as the lamp’s frame.
- Secure the Structure: Use thin wire or natural twine to tie intersections for added stability.
- Attach the Fixture: Insert the light fixture inside the woven basket.
- Ensure it’s securely attached and does not pose a safety risk.
Pro Tips:
- Color Choices: Consider painting the twigs with non-toxic paint for a pop of color.
- Add Texture: Incorporate different types of twigs for an interesting visual appeal.
- Size Matters: Adjust the size of the basket to fit the space it’s meant for—larger for dining areas, smaller for cozy nooks.
The final result is a unique lamp that not only illuminates but also serves as a conversation piece.
Tutorial/Source: etsy.com
3. Quirky Toolbox Handles
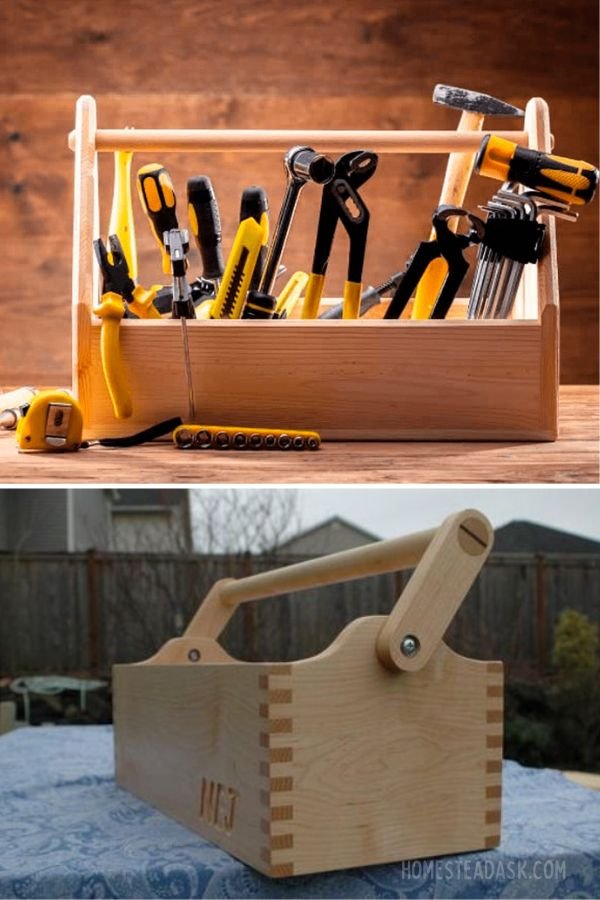
Adding quirky handles to a toolbox can bring a touch of nature indoors. Using sticks or twigs for handles is a fun and creative project.
First, select sturdy sticks that fit the size of the toolbox. Look for ones that are comfortable to grip.
Next, measure and cut the sticks to the desired length. The handles should be long enough to allow for a secure hold.
To attach the handles, drill holes on both sides of the toolbox.
Insert the sticks through each hole and secure them with strong glue or small screws.
Materials Needed:
- Sturdy sticks or twigs
- Drill
- Strong glue or screws
- Measuring tape
- Saw (if cutting is needed)
This project is simple yet effective. It not only enhances the look of the toolbox but also keeps it functional.
They can create handles of various shapes, such as curved or straight. Each toolbox will be unique based on the materials used.
Making quirky toolbox handles is a great way to recycle natural materials while adding character to a common item.
4. DIY Twiggy Christmas Tree
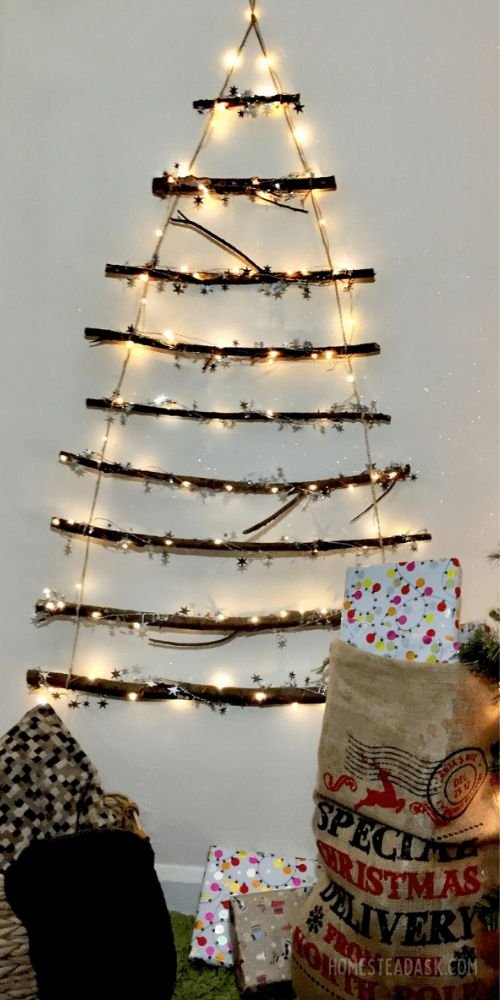
Creating a DIY Twiggy Christmas Tree adds a unique touch to holiday decorations. It combines natural materials with festive spirit, making it a fun project for all ages.
Materials Needed:
- Twigs of various lengths
- Hot glue gun and glue sticks
- Scissors or pruner
- Wire for support (optional)
- Decorations like beads, ribbons, or lights
Instructions:
- Select Twigs: Gather twigs from your yard or nearby parks. Choose both short and long pieces for a layered look.
- Create the Base: Start with the longest twig for the trunk. Secure it in place on a sturdy base, like a wooden board or a pot.
- Layer the Twigs: Glue shorter twigs at angles to form branches.Begin at the bottom and work your way up, overlapping them for fullness.
- Decorate: Once the tree is shaped, add decorations.Use beads, ribbons, or even fairy lights to enhance its charm.
- Finishing Touches: Encourage creativity! Paint the twigs or add glitter for a festive sparkle.
This project not only brings joy but also connects to nature, making it a meaningful addition to any holiday setting.
It’s perfect for families looking to craft together and can serve as a lovely centerpiece or gift.
Tutorial/Source: themummyfront.com
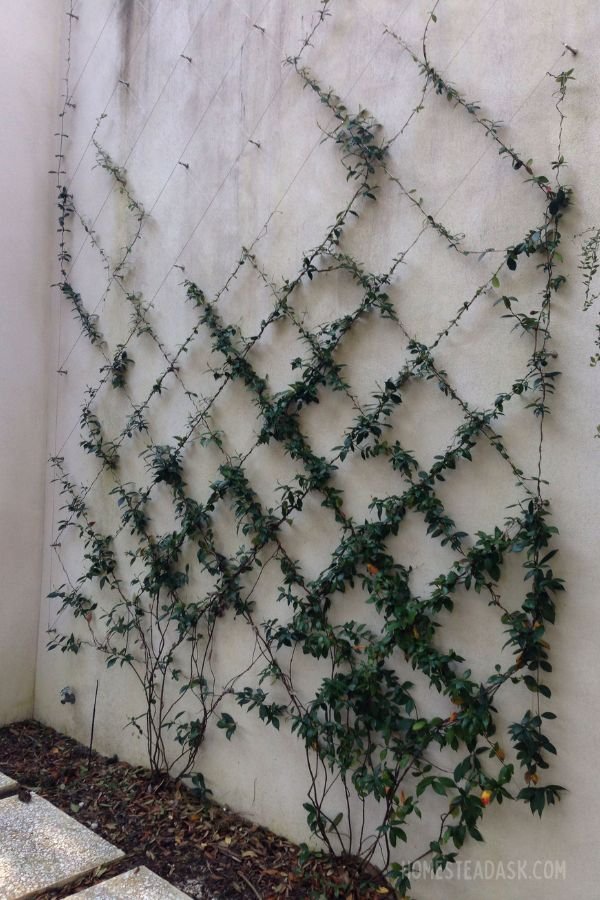
5. Diamond Patterned Twig Lattice
Creating a diamond patterned twig lattice is a simple and charming project for any garden. This lattice design is not only decorative but also provides support for climbing plants.
To start, gather materials like straight twigs and lightweight twine.
It’s best to choose twigs that are about ½ to ¾ inch thick for stability.
Steps to Build the Lattice:
- Cut the Twigs: Determine the size of the lattice and cut twigs accordingly. Typically, lengths of 3 to 5 feet work well.
- Shape the Base: Lay out two vertical twigs using a diamond shape. Connect them with horizontal twigs.
- Tie with Twine: Use lightweight twine to secure the connections at each intersection.
- This helps maintain the shape and provides strength.
- Finish the Design: Repeat the process with diagonal twigs to enhance the diamond pattern.
- Secure each part firmly.
This lattice works well as a backdrop for flowers or vegetables. It adds visual interest while being functional.
Once complete, place the lattice against a wall or fence.
It can also stand alone in a garden bed. Climbing plants, such as peas or morning glories, will thrive when they climb the structure.
6. DIY Wattle Fencing
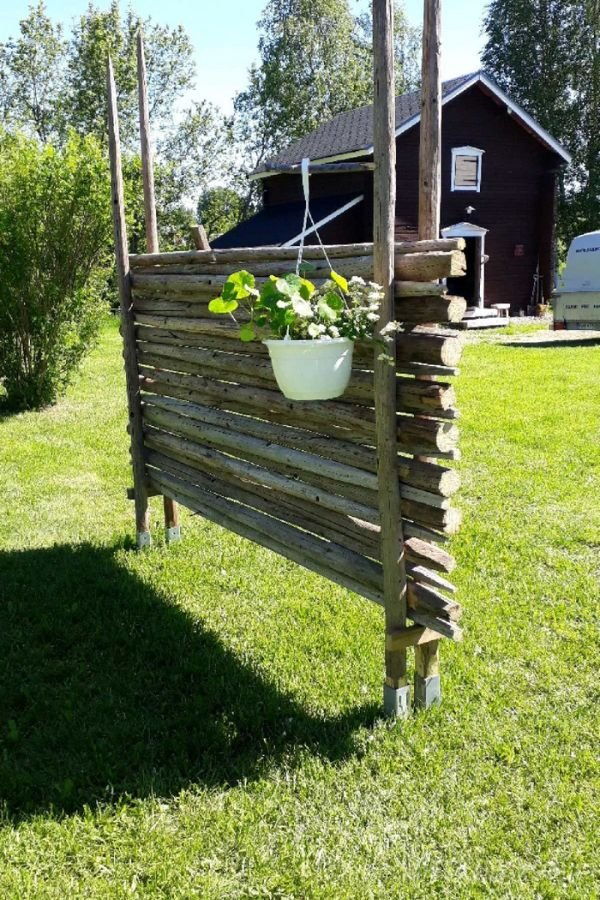
Wattle fencing is a creative and eco-friendly way to enhance any garden. This traditional method uses flexible branches or twigs woven together, creating a rustic barrier.
Materials Needed:
- Sticks or Twigs: Choose sturdy ones, about 4 to 6 feet long.
- Support Posts: Wooden stakes to anchor the fence.
- Wire or Twine: Optional, for extra security.
Steps to Build:
- Prepare the Area: Decide where the fence will go and clear the space.
- Set Support Posts: Drive posts into the ground at roughly 3-4 foot intervals.
- Weave Sticks: Start weaving twigs horizontally between the posts. Push them firmly into the ground for stability.
- Add More Layers: Continue this process, working in sections until the desired height is reached.
Tips:
- Use thinner branches for tight weaves and a neater look.
- Wattle fencing provides a great habitat for local wildlife.
- It can be used to create borders or garden beds.
Creating a wattle fence is not just functional; it adds charm to any outdoor space. This style fits seamlessly into gardens and encourages natural growth without sacrificing aesthetics.
7. Rustic Twig Arbor
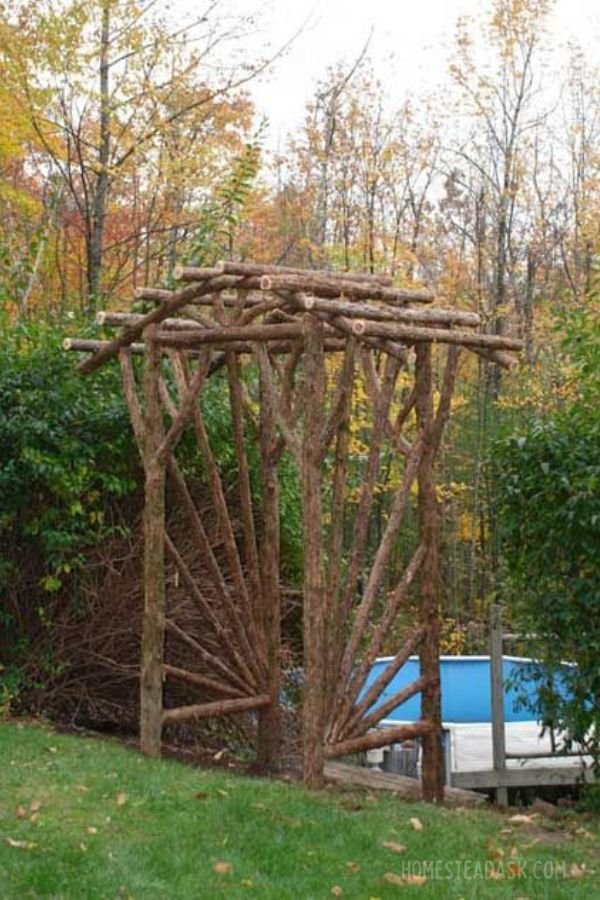
Creating a rustic twig arbor is a delightful project that adds charm to any garden. This structure can serve as an entrance, a garden centerpiece, or a place for climbing plants to thrive.
To start, gather materials like sturdy sticks, twigs, and branches. Heavier branches work well for the frame, while thinner twigs can fill in the gaps.
Steps to Build a Rustic Twig Arbor
- Design the Frame: Plan the size and shape of the arbor. A simple rectangular or arch design works best.
- Construct the Base: Secure the thicker branches into the ground to form a stable base. Use a sturdy, strong wood to ensure durability.
- Add the Twigs: Attach smaller twigs to create the sides. Cross them for added support and visual appeal.
Tips for Success
- Choose Appropriate Wood: Look for naturally weather-resistant types like cedar or redwood.
- Use Natural Twine: For tying branches together, a natural twine blends well and adds to the rustic look.
- Incorporate Plants: Consider weaving climbing plants like morning glories or wisteria through the arbor for a lively touch.
A rustic twig arbor not only enhances the beauty of a garden but also provides a perfect spot for relaxation. It’s an enjoyable project that brings an authentic, natural feel to outdoor spaces.
Tutorial/Source: romancingthewoods.com
8. Adorable DIY Fairy Garden Furniture
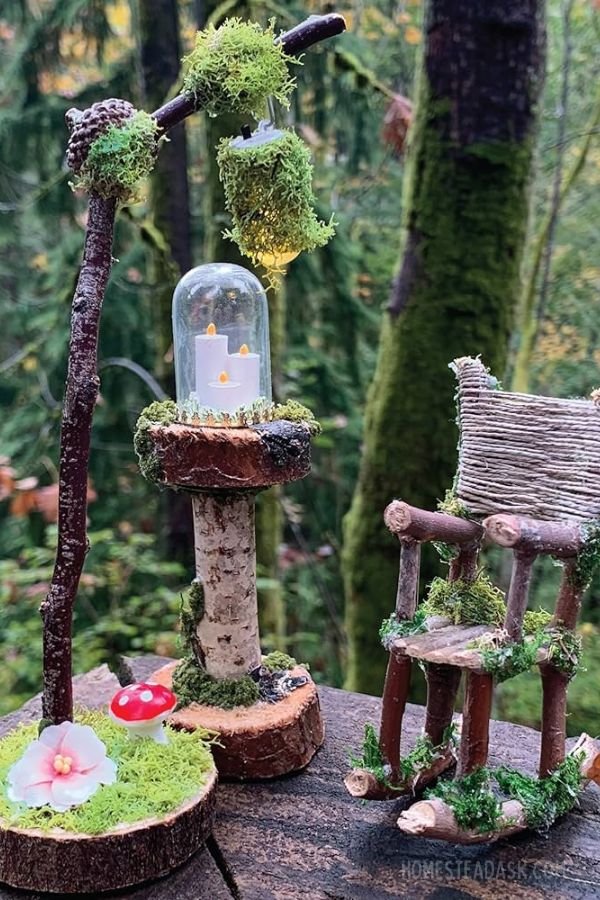
Creating fairy garden furniture can be a fun and rewarding project. Using natural materials like sticks and twigs, anyone can craft charming pieces for their miniature garden.
Ideas for Fairy Furniture
- Acorn Birdhouses: Small acorn shells can be made into adorable birdhouses. They’re easy to assemble and add a whimsical touch to the garden.
- Twig Chairs: Twigs can be cut and arranged to form tiny chairs. They make perfect seating for fairies and are entirely free to make.
- Popsicle Stick Tables: Popsicle sticks can be glued together to create small tables. This project is simple and allows for creativity in design.
- Fairy Windows: Using sticks or other natural materials, fairy windows can be crafted. They can be added to any structure to give it a cozy feel.
Decorate with Nature
Adding elements like pinecones, stones, and shells can enhance the fairy garden’s charm. These items can serve as benches, tables, or decorative pieces.
DIY projects for fairy garden furniture encourage imagination. Gathering materials from the backyard makes this craft enjoyable for all ages. The finished pieces not only beautify the garden but also invite creativity through play.
With a few simple items and some creativity, delightful fairy furniture can bring any garden to life.
9. Rustic-Looking Framed Twig Art
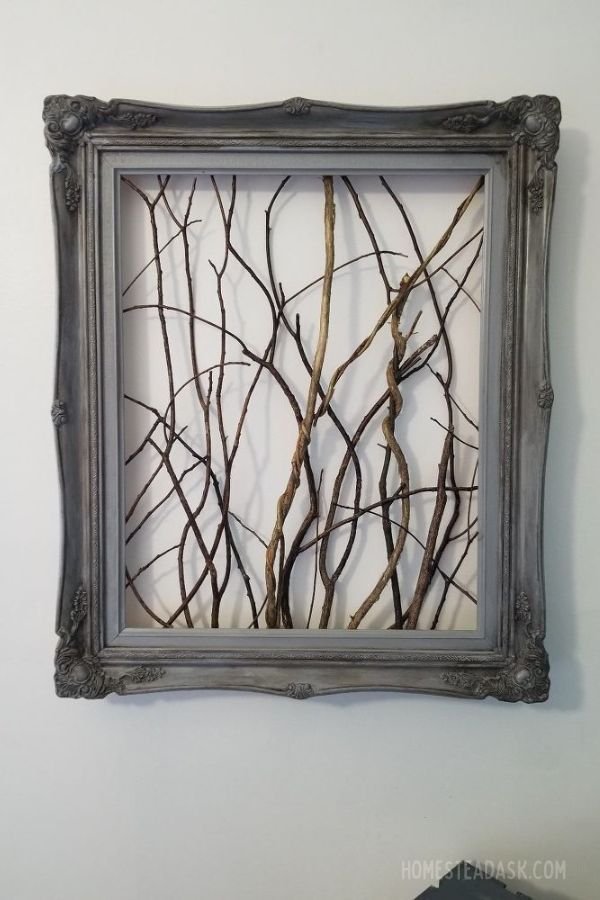
Creating framed twig art brings a natural touch to home decor. This project is simple and requires only a few materials.
Materials Needed:
- Twigs of various sizes
- A picture frame
- Hot glue gun
- Scissors
To start, select a picture frame that suits the desired size for the artwork. It can be an old frame or a new one.
Next, gather twigs from the garden or nearby. Choose twigs that vary in length and thickness for visual interest. Trim them with scissors to fit the frame.
Using the hot glue gun, attach the twigs to the frame’s edges. They can be placed side by side or layered for a more textured look. Make sure to secure each twig well so it stays in place.
Once the glue dries, add a piece of art or a photo inside the frame. This enhances the rustic feel and personalizes the piece.
Hang the finished framed twig art in a living room, hallway, or garden shed. It creates a charming focal point.
This craft is not only budget-friendly but also a great way to showcase nature’s beauty in any space.
Tutorial/Source: hometalk.com
10. Upcycled Twig Bird Nest Art
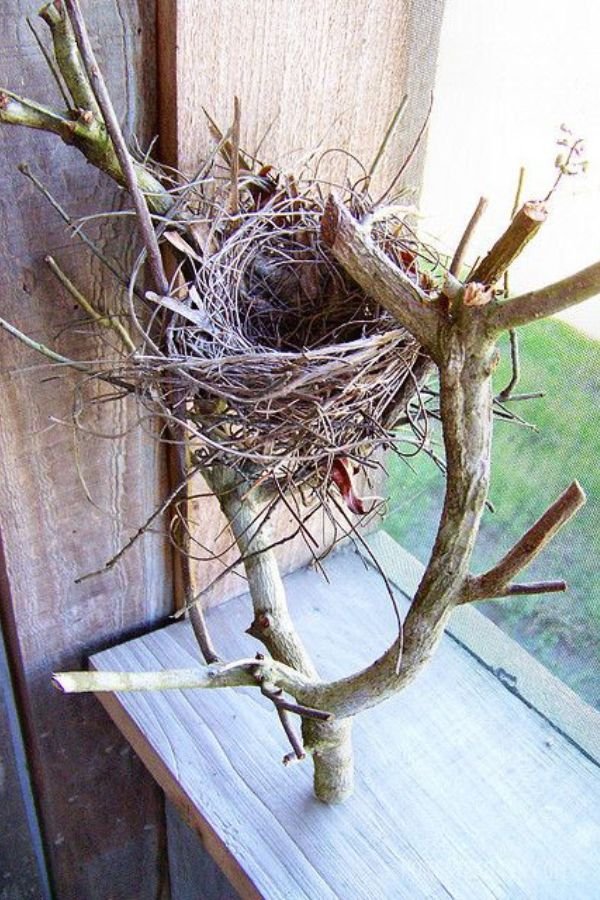
Creating upcycled twig bird nest art is a fun and easy way to add charm to any garden or home. This project allows crafters to use natural materials to express their creativity.
Gather twigs of various sizes. Make sure they are clean and dry. Small, thinner twigs work well for detailing, while larger sticks form the nest base.
To start building, lay the larger twigs in a circular shape. Overlap them slightly to give structure. Then, add smaller twigs inside the circle, weaving them in and out. This weaving technique helps hold the nest together.
Consider adding embellishments like moss, small stones, or dried flowers. These additions can enhance the nest’s appearance and make it feel more organic.
It’s also possible to hang the nest using twine or fishing line. This way, it can be displayed on a tree branch or a hook in the garden. A hanging bird nest art piece can attract birds and promote wildlife in the area.
Some might choose to paint the twigs for a more decorative look. Non-toxic paint can offer a splash of color and make the nest stand out.
Upcycled twig bird nest art is perfect for those who enjoy DIY projects. It combines creativity with a love for nature, making it a wonderful addition to any outdoor space.
Source: flickr.com
11. Garden Plant Support
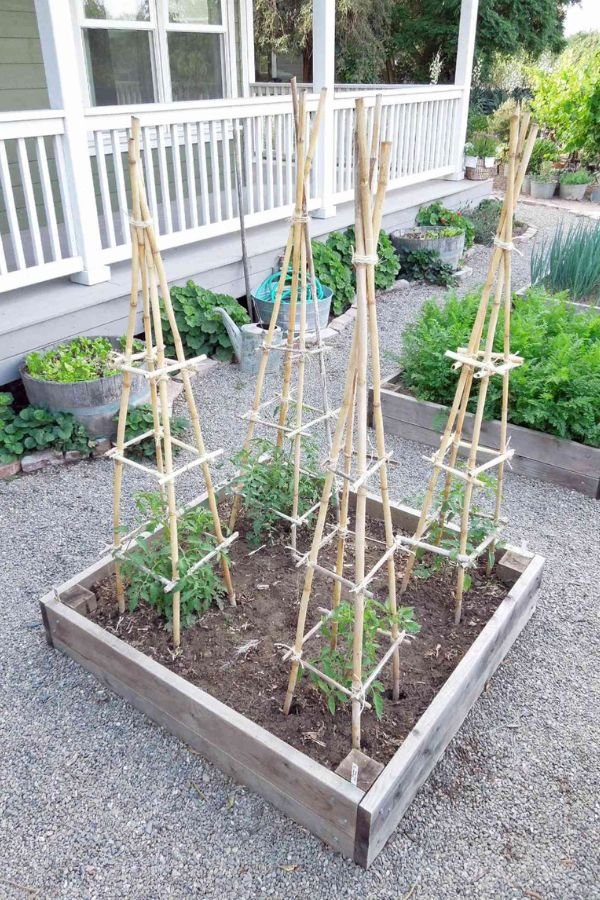
Using sticks and twigs for plant support is both practical and creative. These natural materials can provide sturdy backing for growing plants, helping them flourish.
Types of Plant Support:
- Trellises: Twigs can be used to create trellises for climbing plants like beans or cucumbers. They provide an attractive structure for plants to cling to.
- Stake Supports: Straight sticks make excellent stakes. They can be driven into the ground next to a plant, supporting it as it grows taller.
- Cages: Small branches can be woven together to create cages for plants that need extra stability, such as tomatoes.
How to Make Plant Supports:
- Trellis: Arrange twigs in a triangle and tie them at the top for a simple trellis.
- Stake: Choose sticks about 3-4 feet long. Push them into the soil near the base of the plant.
- Cage: Make a circular frame with branches, securing them with twine for added strength.
Benefits:
- Affordable and sustainable
- Adds a natural look to the garden
- Supports healthy plant growth
With a little creativity, using sticks and twigs for garden plant support can enhance any gardening project.
Tutorial/Source: thespruce.com
12. Natural Raised Garden Bed
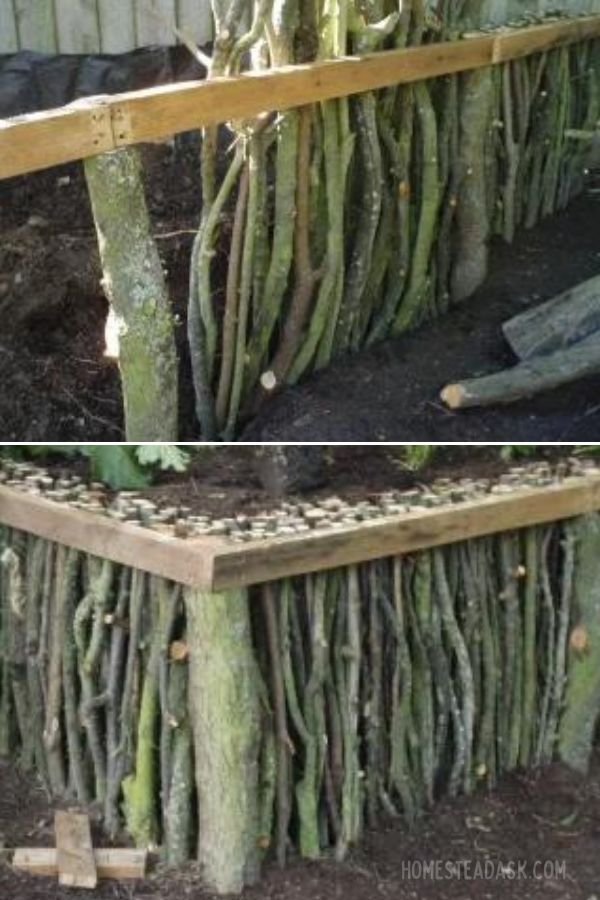
Creating a natural raised garden bed with sticks and twigs is a great way to use materials readily available in your yard. This method not only saves money but also adds rustic charm to the garden.
Steps to Build a Natural Raised Garden Bed
- Choose the Location: Find a sunny spot in the garden that gets plenty of light. This ensures healthy plant growth.
- Gather Materials: Use sticks, twigs, and branches. Collect sturdy, straight pieces to form the sides.
- Build the Frame:
- Lay down four longer sticks for the corners.
- Connect smaller twigs horizontally to create the sides.
- Fill with Soil: Once the frame is complete, fill it with a mix of garden soil and compost. This enriches the bed for the plants.
- Plant Your Seeds: Choose plants that thrive in your climate. Herbs, vegetables, and flowers can all flourish in this setup.
Benefits of Natural Raised Garden Beds
- Improved Drainage: Enhanced drainage helps prevent waterlogging.
- Better Soil Quality: Raised beds can be filled with nutrient-rich soil.
- Easy Maintenance: They are easier to tend to, reducing the strain on the gardener’s back.
Tutorial/Source: www.instructables.com
12. Upcycled Branch Coat Hanger
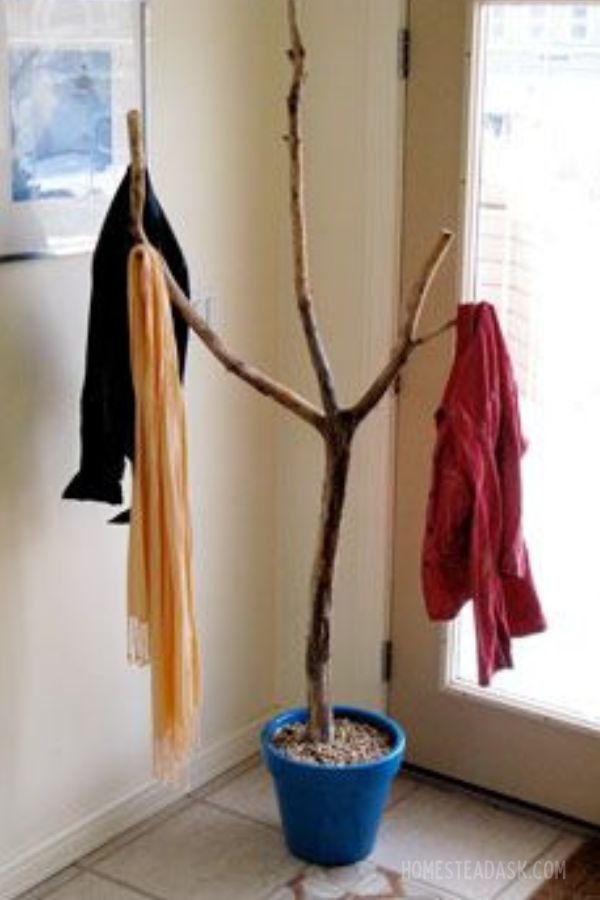
Creating an upcycled branch coat hanger is a fun and eco-friendly project. It helps organize space while adding a rustic touch to any room.
Materials Needed:
- Sturdy branches
- Wood glue or screws
- A base panel (wood or sturdy cardboard)
- Hooks (optional)
Start by selecting straight branches. The size depends on the space available.
Ensure they are clean and dry for the best results.
Next, attach the branches to the base panel using wood glue or screws. Position them in an appealing or functional layout. For added functionality, hooks can be attached to the branches.
Steps to Follow:
- Gather materials: Collect branches and base materials.
- Design the layout: Experiment with branch placement.
- Secure branches: Use glue or screws to secure.
- Finish the hanger: Add hooks if desired.
This project not only recycles natural materials but also showcases creativity. An upcycled coat hanger makes a great conversation piece. Plus, it’s a practical solution for keeping coats organized.
By completing this project, you can enjoy both beauty and functionality. It’s a simple yet effective way to enhance home decor while promoting sustainability.
13. DIY Outdoor Garden Table
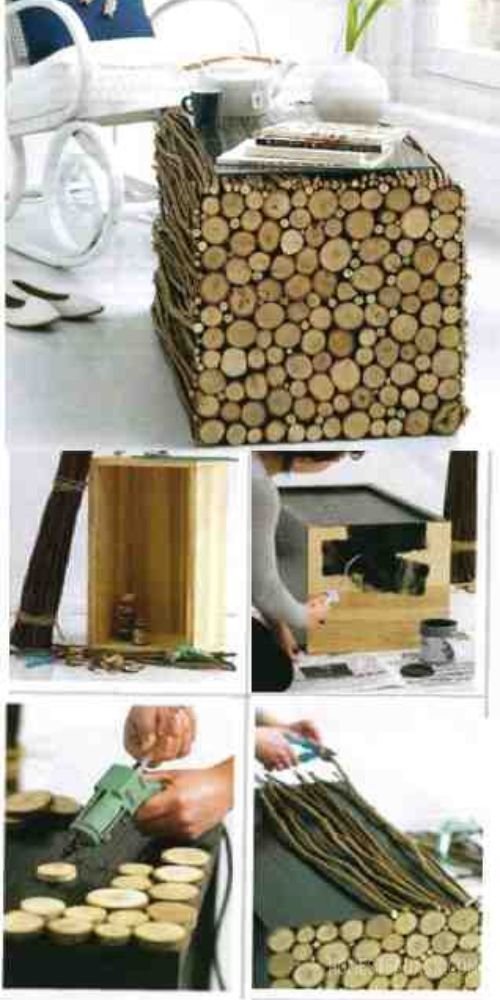
Creating an outdoor garden table from sticks and twigs is a fun and practical project. It provides a stylish spot for outdoor gatherings or relaxing moments in the garden.
Materials Needed
- Sturdy sticks or twigs
- Wooden board for the tabletop
- Nails or screws
- Wood glue
- Sandpaper
- Outdoor sealant
Steps to Build
- Design the Table: Determine the size and shape of the table. A rectangular design works well for most spaces.
- Prepare the Base: Gather sticks of similar length to form the legs and supports. Cut them to the desired height.
- Attach the Legs: Secure the legs to the wooden board using nails or screws. Ensure they are stable.
- Create the Frame: Use additional sticks to create a frame around the bottom of the tabletop for extra support.
- Finish the Surface: Sand the table to remove any splinters. Apply outdoor sealant to protect it from the elements.
This DIY project allows for creativity. Twigs can add rustic charm, while a smooth wooden surface provides functionality. Not only does this table serve a purpose, but it also enhances the outdoor space.
Tutorial/Source: diyfunideas.com
14. Twig Adirondack Chairs
Twig Adirondack chairs are a charming addition to any outdoor space. They are not only functional but also bring a rustic touch to gardens and patios.
Building these chairs is a fun project. It allows for creativity while using natural materials. Using straight twigs and branches makes construction simple and enjoyable.
Materials Needed:
- Sticks and twigs (varying lengths)
- Twine or wire for securing
- Saw for cutting
- Sandpaper for smoothing edges
To start, design a basic Adirondack shape. This chair’s unique slanted back and wide armrests provide comfort. Assemble the frame first, then attach the slats for the seat.
Tips for Construction:
- Choose twigs that are sturdy and straight. This will help ensure the chair is strong and stable.
- Always sand the edges to prevent splinters. Comfort is just as important as appearance.
After completing the chair, finish it with a weather-resistant seal. This will extend its life, especially when left outside.
Twig Adirondack chairs are perfect for relaxing with a good book or enjoying coffee in the morning sun. They also make a great conversation piece for gatherings.
This DIY project offers a blend of functionality and natural beauty, making it a delightful addition to any garden.
15. Upcycled Twig Planters
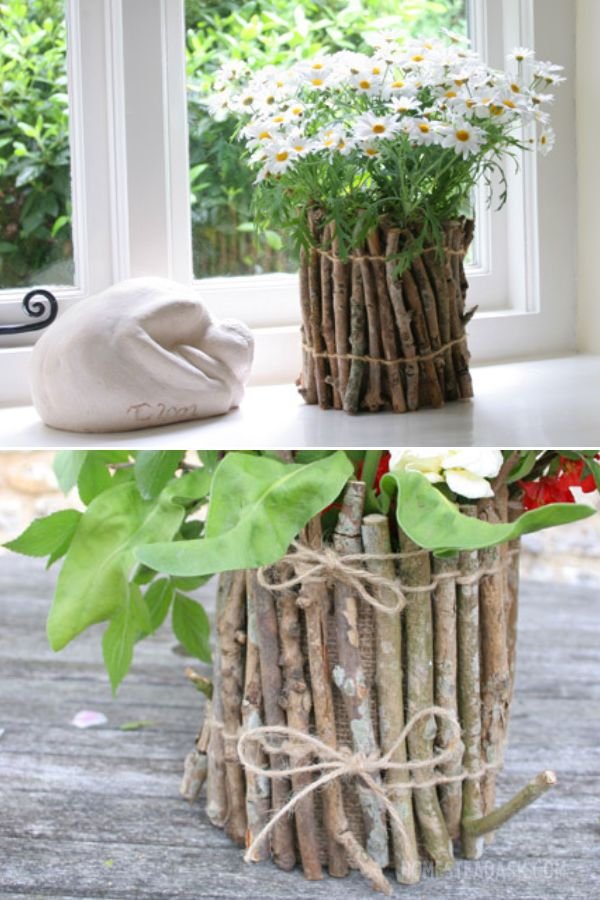
Creating upcycled twig planters is a fun and eco-friendly project. This rustic craft adds charm to any garden or home.
Materials Needed:
- Dried twigs or sticks
- Small plastic containers
- Hot glue gun
- Scissors
- Potting soil
First, gather a variety of twigs. Look for different lengths and thicknesses to create texture.
Next, take a plastic container and cover it with a layer of glue. Begin sticking the twigs on the outside, starting from the bottom working up. Make sure to fill in gaps for a more natural look.
After covering the container, trim any excess twig that sticks out too much. This step ensures it looks neat and finished.
Once the planters are complete, fill them with potting soil. They are perfect for growing small plants or herbs.
Tip: To enhance their lifespan, consider applying a sealant to protect the twigs from moisture.
These upcycled twig planters not only serve a practical purpose but also bring a unique aesthetic to any space. They make great gifts and can be placed on patios, decks, or even inside the house to showcase personal style. Enjoy the process of creating something beautiful from materials that would otherwise go to waste!
Tutorial/Source: ninimakes.typepad.com
16. Decorative Twig Lettering
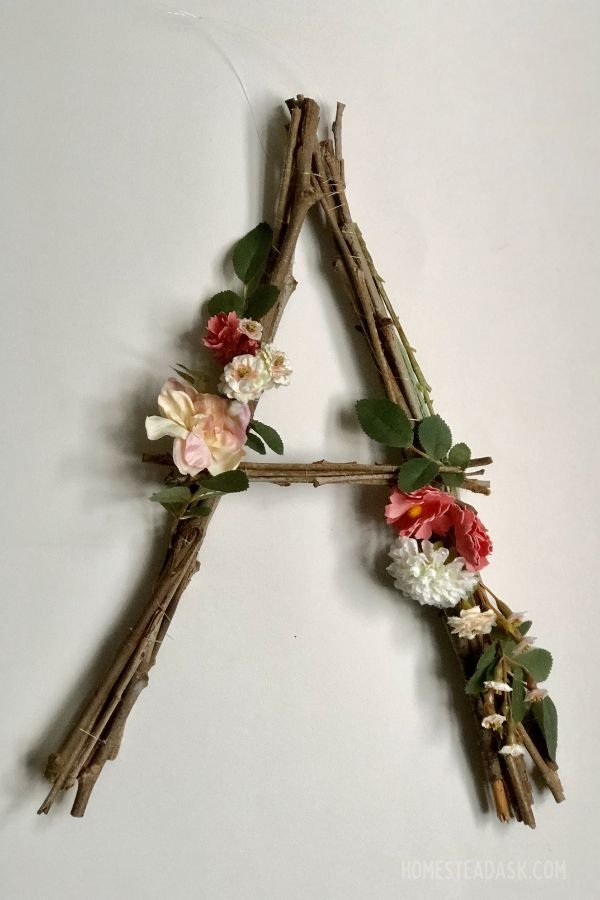
Decorative twig lettering offers a charming way to personalize home spaces. Using natural materials like twigs, anyone can create unique signs or art pieces. This project is perfect for those who enjoy crafting.
To start, gather sticks and twigs of varying lengths. Look for straight and sturdy pieces. Next, decide on a word or phrase to create. Simple words like “Welcome” or “Home” work well.
Materials Needed:
- Twigs of different sizes
- Hot glue gun
- Craft knife
- Scissors
- Optional: Paint or stain
Once the materials are ready, outline the letters on a flat surface. Arrange the twigs to form each letter. Use the hot glue gun to secure the twigs together. Careful gluing ensures durability.
For added flair, consider painting or staining the finished letters. This step can enhance the natural look or match interior decor.
Tips for Success:
- Choose twigs that are similar in thickness for a uniform appearance.
- Let the glue dry completely before displaying your art.
- Experiment with different fonts and sizes for creativity.
Decorative twig lettering is not just a cute project; it also makes for a delightful gift. Friends and family will appreciate the thoughtfulness behind personalized decor. Creating these pieces can add a rustic touch to any home or garden space.
Tutorial/Source: pickystitch.com
17. DIY Twig Plant Markers
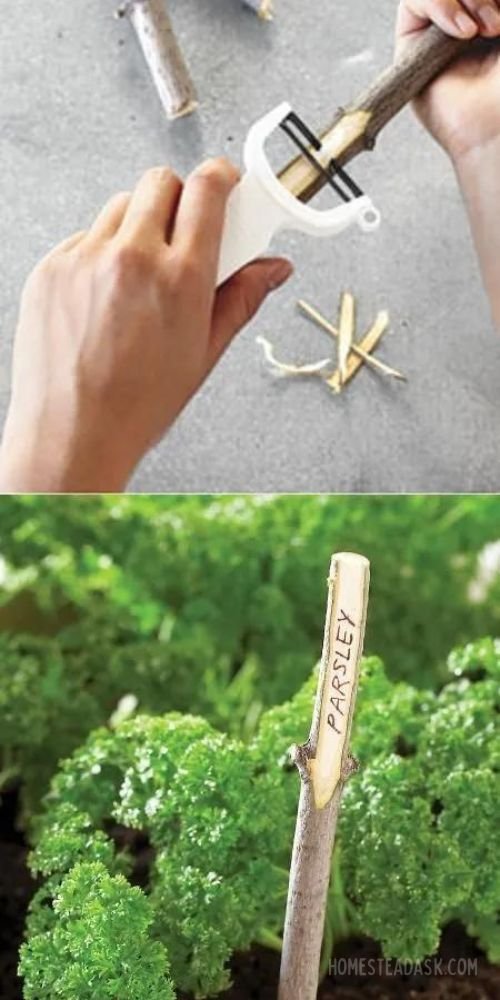
Creating twig plant markers is a fun and simple project for any garden enthusiast. These natural markers add charm while helping to identify plants.
Materials Needed
- Twigs: Gather straight pieces about 6 to 12 inches long.
- Razor blade or penknife: For carving.
- Optional: Paint or wood sealant for decoration.
Steps to Create Twig Plant Markers
- Prepare the Twigs: Remove any rough edges with a knife. This makes them easier to handle.
- Carve Names: Gently carve the plant names into the twigs. Simple letters work best.
- Decorate (Optional): Use paint to add colors or designs. Seal the markers with a wood sealant to increase durability.
- Insert in Soil: Place the markers in front of the corresponding plants in the garden.
Tips
- Choose twigs that are not too thick for easier carving.
- Using a light touch while carving will help avoid breaking the twig.
- Personalizing markers can make the garden space feel unique.
Tutorial/Source: berrydroplife
18. Rustic Twig Picture Frame
Creating a rustic twig picture frame is a simple yet charming project that adds a natural touch to any home decor. This project is perfect for those who enjoy crafting with materials found in nature.
Materials Needed:
- Twigs or small branches
- A sturdy piece of cardboard or wood for the backing
- Hot glue gun and glue sticks
- Scissors
- A photo to frame
Steps:
- Choose Twigs: Select twigs of various lengths for a unique look. Collect enough to cover the frame’s outline.
- Cut the Backing: Measure and cut the cardboard or wood to the desired frame size.
- Create the Frame Shape: Lay out the twigs to form a rectangle or square around the backing.
- Glue the Twigs: Use the glue gun to attach the twigs to the edges of the backing. Make sure to hold each twig in place until it sets.
- Insert the Photo: Once the frame is dry, place the photo behind the twigs and secure it with more glue or tape.
This DIY project not only showcases cherished memories but also brings a cozy, rustic feel to any room. It is a great way to use materials from the garden and personalize your space
![12+ Lawn Edging Ideas on a Slope - [Keep Grass in Check] 20 12+ Lawn Edging Ideas on a Slope - [Keep Grass in Check]](https://homesteadask.com/wp-content/uploads/2024/09/12-Lawn-Edging-Ideas-on-a-Slope-Keep-Grass-in-Check-768x614.jpg)

![How To Lay Brick Border Garden Edging - [11 Easy DIY Step] 23 How To Lay Brick Border Garden Edging - [11 Easy DIY Step]](https://homesteadask.com/wp-content/uploads/2024/09/How-To-Lay-Brick-Border-Garden-Edging-11-Easy-DIY-Step-1-768x614.jpg)
![How To Fill Raised Garden Beds - [With Simple 5 Layer!] 24 How To Fill Raised Garden Beds - [With Simple 5 Layer!]](https://homesteadask.com/wp-content/uploads/2024/09/How-To-Fill-Raised-Garden-Beds-With-Simple-5-Layer-768x614.jpg)